.svg)


Known for its easy and accessible payment gateway, Stripe is a household name when it comes to B2B payment processing.
Despite being so good at accepting payments, they lack in one area...
That area being one-click upsells.
Unfortunately, Stripe does not have a native way to accept one-click upsells on your site.
Not having one-click upsells in their app causes merchants to miss out on revenue during checkout.
In this article, we will discuss how anyone can enable stripe upsell's on any site or platform.
The best part is, this solution is free and requires zero coding knowledge.
Let's get started.
What Is A One-Click Upsell?
An upsell is the process of customers buying more products after their initial payment.
An example of this would be when you go to McDonald's and buy a chicken sandwich or burger.
And then the hostess asks if you want fries or a drink.
You didn't intend to buy the fries or drink, but you decided to add it on because the hottest gave you the option.
Customer's spend more money at Mcdonald's because of a simple question.
A one-click upsell is the same idea, but online.
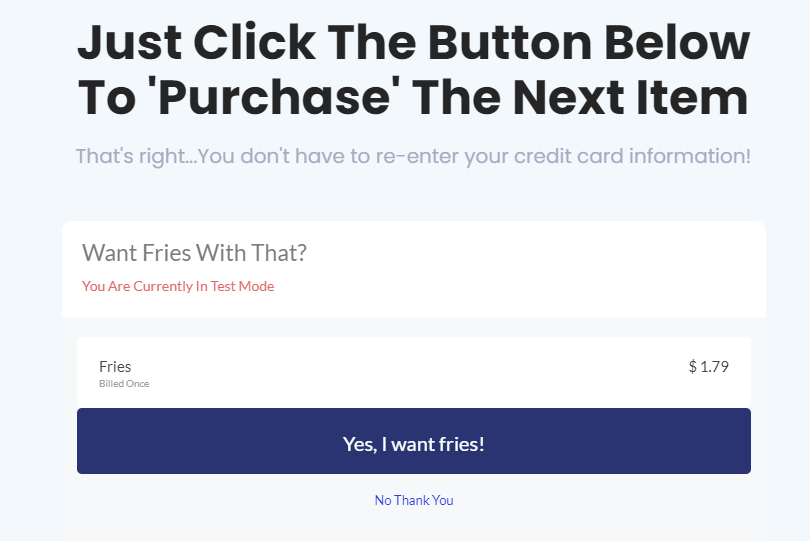
A merchant (you) asks a customer if they want to buy more products after the first sale.
You make more money because more people buy from you.
Which increases your revenue making you more profit.
The more items they see, the higher chances of them making extra purchases.
Another important note here is that you don't have to spend more on marketing because you already have the customer on your website.
All you need to do is show them more products.
How To Sell One-Click Upsells On Stripe
Now the question becomes how do you offer one-click upsells using Stripe?
As mentioned before, Stripe does not have one-click upsell functionality.
You will need to use a third-party service to offer one-click upsells to your site.
There are a few, but in this article, we will reference Cartfuel.io .
What Is Cartfuel

Cartfuel is solution that helps maximize your profits by integrating checkout form's and upsells on any landing page platform.
They help you increase your average order value by up to 30% through easy-to-use software.
The best part is regardless of the use of WordPress, Webflow, or anything else; you'll be able to sell more products.
How To Get Started With Cartfuel
To get started using Cartfuel, go to cartfuel.io.
Sign up for a free account.
Once you create your account, you will then want to add your Stripe account.
Note: This assumes that you have a Stripe account. If you don't, follow our Stripe payments tutorial.
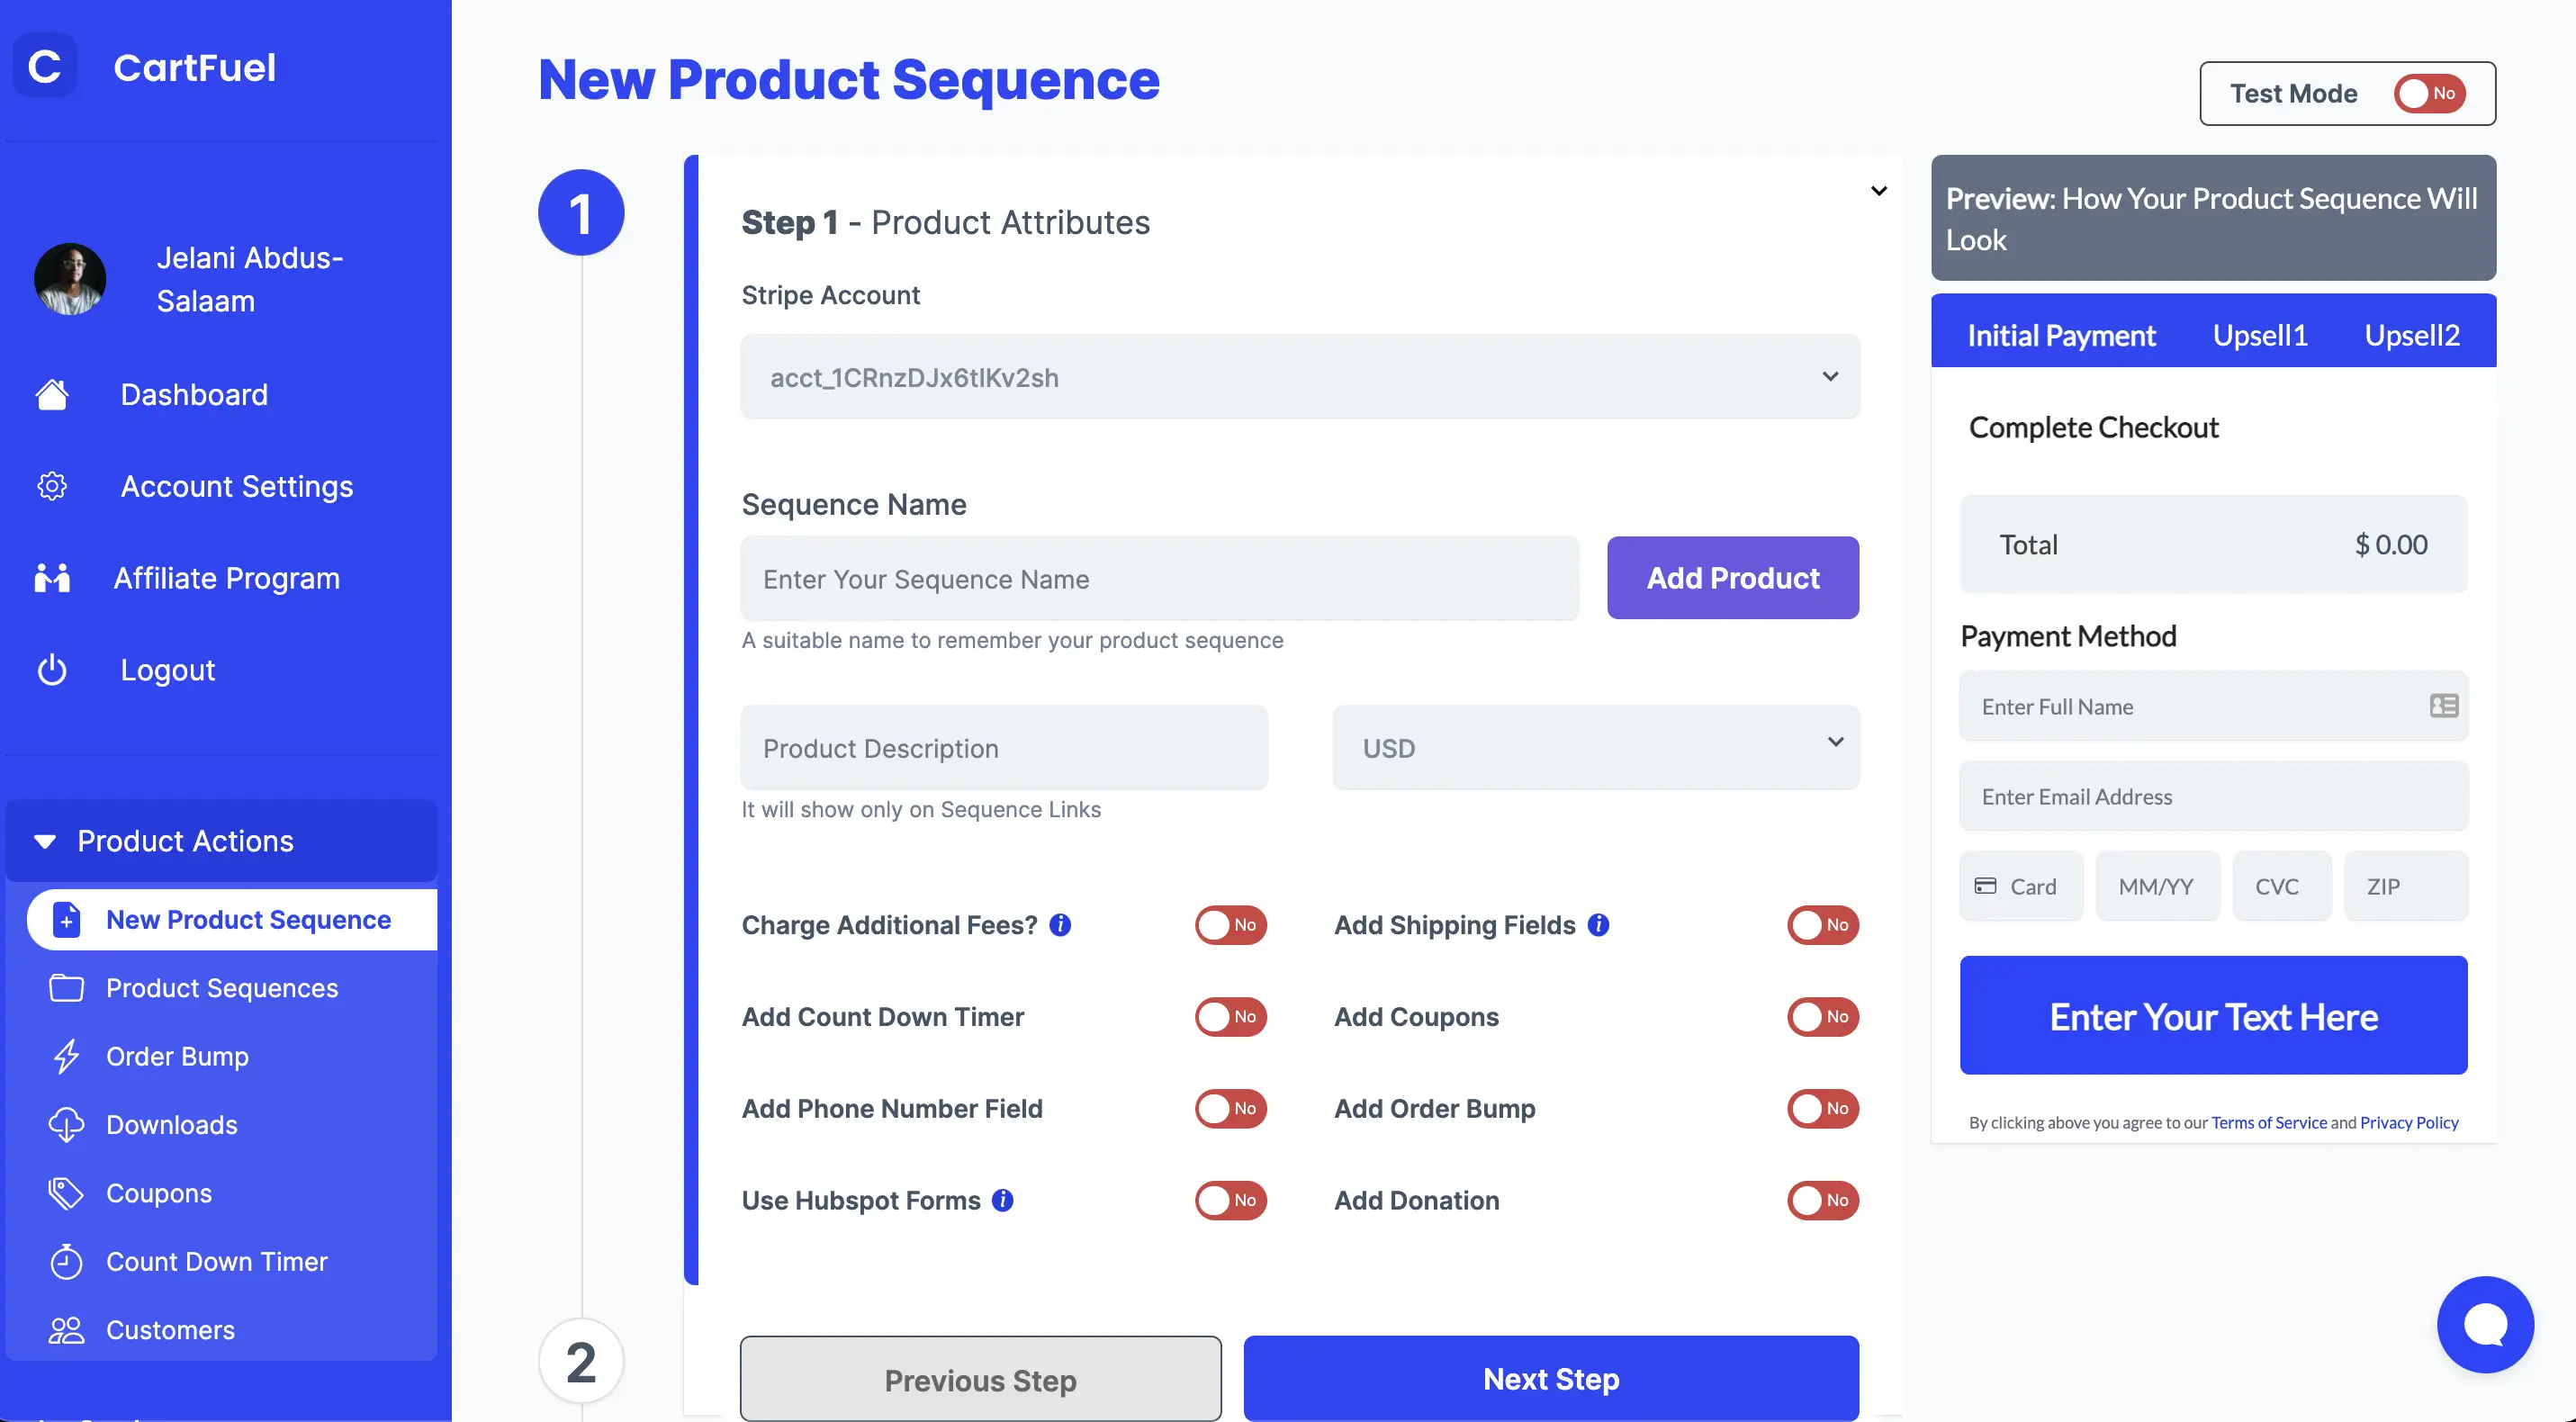
Once you connect your Stripe account, you will want to create a product sequence.
A product sequence is nothing more than a payment form and upsells (if you choose to have them).
Click 'New Product sequence' in the left-hand corner menu.
From there, you can begin to add your product name, product currency, price, and billing frequency.
How Cartfuel Works - Full Tutorial Video
You can also add other revenue-boosting add-ons like:
- Charging additional fees
- Add quantity field
- Charging taxes
- Add shipping fields
- Add coupons
- Add order bumps
- Add countdown timers
Once done, you can click on the 'Next step' button.
In the second step, you can add more customization to your product sequence like:
- Adding custom fonts
- Selecting a form style
- Adding payment headers
- Editing the placeholder text
- Changing the button text
- Changing the button color
- Changing the button radius
You can also add custom CSS, but be sure to reach out to a qualified developer if you want to change the form using CSS.
Once done, move on to the next step.
In the third step, you can decide where you want your customers to go after they buy.
In the input box, you add the thank you page, OR you can offer an upsell.
If you choose not to use an upsell, then you can enter the URL of your thank you page.
If you want to add an upsell, then enter the URL of your upsell page.
For example: If your upsell page is example.com/audiobook, then you'd put that URL into that input box.
Then you will toggle on the 'Upsell Product Page' toggle.
Once you toggle that on, you will new fields to set up your upsell.
As we did in the previous step, you will add a price, a name, and billing frequency. You can also update the button text, button color and add custom CSS.
Once done, click the next step where you can set up emails, which is optional.
Note: The email functionality is a paid feature.
Click save once you are ready to place your product sequence on your website.
How To Sell One-Click Upsells On Your Website Using Stripe
Once you save your product sequence, then you will see a popup appear.
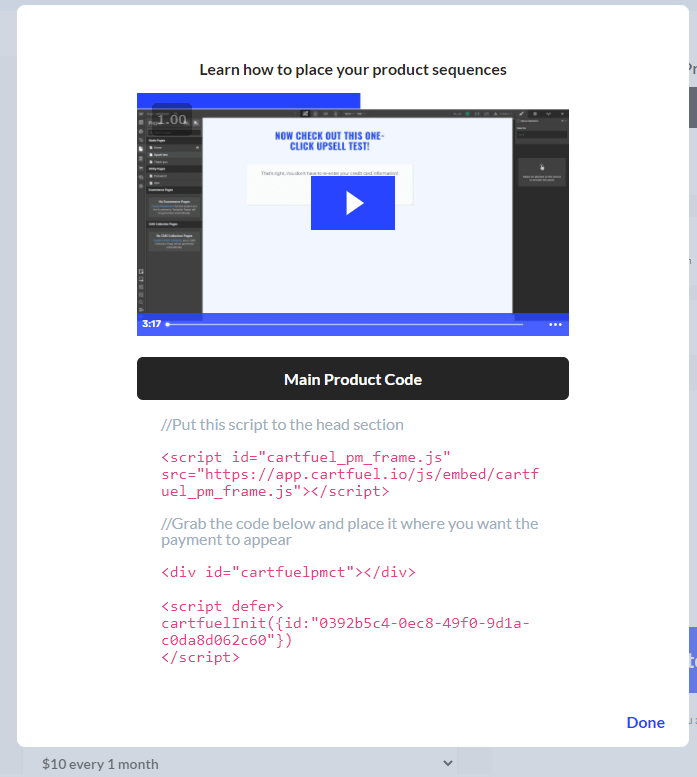
In that popup, you will find your code snippets.
But don't get too scared; you don't need to do anything with that code besides copy and pasting it.
To start, you will want to access your site and make sure that you can add HTML/Embed elements.
Most site builders can add HTML/Embed elements.
Once you verify, you can add HTML/Embed elements, locate the page where you want to sell the main product.
Add an HTML/Embed element to that page.
Then go back to Cartfuel and copy the first code snippet.
Paste that first code snippet inside of the HTML/Embed element.
Proceed to go back to Cartfuel and copy the second code.
Then go back to your site and paste the second code into the HTML/Embed element.
You will now see your payment form on your checkout page.
Depending on whether you have applied an upsell, you can see the second set of codes.
In that scenario, you're going to want to go to your WordPress Upsell site.
Repeat this process.
Add the HTML/Embed element to that same section.
Go to Cartfuel and copy the first code and paste it into your WordPress HTML/Embed element.
Then go back to Cartfuel and copy the second code and paste the code into the HTML/Embed element.
It should look like this when done:
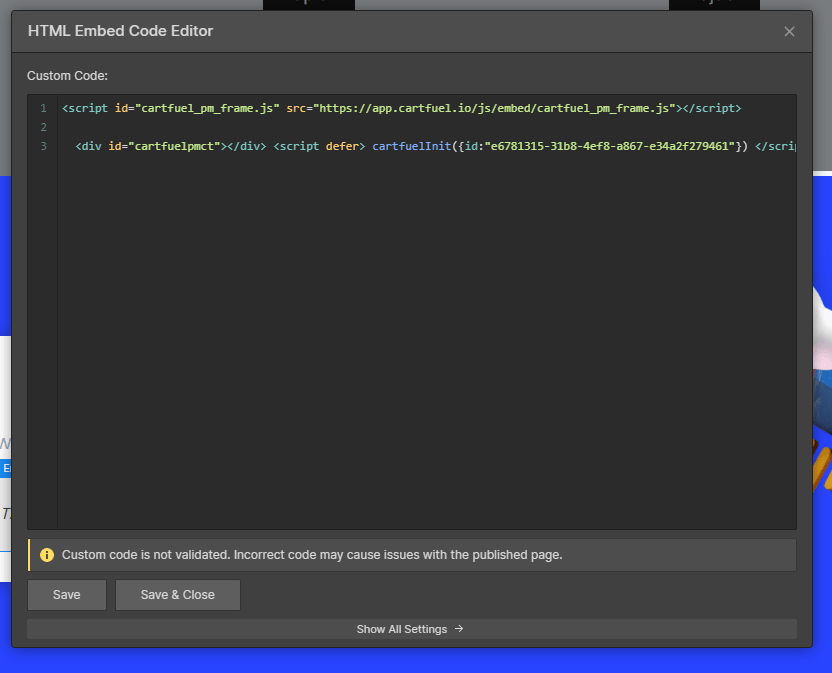
Then click Save on the HTML/Embed element.
How To Test Your One-Click Upsell
Now that you have created a product sequence, you will now want to test and make sure it works.
To do so, you want to make sure your product sequence is set to test mode.
In the product sequence editor, you can toggle the test mode on or off with the toggle next to the 'Next step button.'
Once it's in test mode, you will want to test using the card number 4242 4242 4242 4242 - 04 / 24 - 242 - 42424
If done right, you will redirect to the page you entered in Step 3.
Then if you added an upsell, you could test the upsell by clicking the upsell button.
Then you should redirect to the URL you entered when creating your product sequence.
After the test, we recommend that you test a second time with a real credit card before running traffic to your product sequence.
Crafting Irresistible Upsell Offers
Creating compelling upsell offers is crucial for maximizing revenue through one-click upsells. When done right, upsells can significantly increase the average order value while enhancing the customer experience. Here are some key strategies to consider when crafting your upsell offers:
1. Highlight Complementary Products
One of the most effective ways to encourage upsells is by offering products that complement the initial purchase. For example, if a customer buys a camera, you could offer accessories like a lens, camera bag, or tripod as upsell options. By framing these products as essential add-ons that enhance the main purchase, you create a more compelling value proposition.
2. Use Time-Limited Offers
Creating a sense of urgency can drive customers to act quickly. Consider implementing time-limited upsell offers that are only available for a short period after the initial purchase. This could be phrased as “Add this item to your order in the next 10 minutes for an exclusive discount!” Time-sensitive offers can trigger a fear of missing out (FOMO), prompting customers to take immediate action.
3. Leverage Social Proof
Incorporating social proof into your upsell offers can significantly increase their effectiveness. Highlight how many other customers have purchased the upsell products or include testimonials from satisfied customers. This not only builds trust but also creates a sense of community, encouraging others to follow suit. For instance, “Join the thousands who upgraded their purchase with this must-have accessory!”
4. Create Bundle Deals
Offering product bundles can be an attractive way to upsell. By packaging complementary items together at a discounted rate, you provide customers with a sense of savings while encouraging them to purchase more. For example, if a customer buys a skincare product, consider offering a bundle that includes a cleanser, moisturizer, and serum for a special price. This strategy not only increases average order value but also simplifies the shopping experience for customers.
5. Personalize Recommendations
Utilizing customer data to personalize upsell recommendations can significantly enhance their effectiveness. By analyzing past purchases and browsing behavior, you can offer tailored suggestions that resonate with individual customers. For example, if a customer frequently purchases eco-friendly products, presenting an upsell related to sustainable alternatives can capture their interest.
6. Provide Clear Value
Make sure that your upsell offers clearly communicate the value they provide. Use persuasive language to explain how the upsell product solves a problem or enhances the customer’s experience. For exmaple, instead of simply stating, “Add a warranty for $29.99,” you might say, “Protect your investment with a 2-year warranty for just $29.99, ensuring peace of mind with every purchase.”
7. Utilize Engaging Visuals
The presentation of your upsell offers matters. Use high-quality images and engaging visuals to showcase upsell products effectively. A visually appealing layout can draw attention to the upsell and make it more enticing. Additionally, consider incorporating videos that demonstrate the product in use, which can further highlight its benefits and attract customers.
8. Test Different Approaches
Finally, don’t hesitate to experiment with different upsell strategies. A/B testing allows you to gauge the effectiveness of various offers, messaging, and formats. Test different price points, product combinations, and presentation styles to determine what resonates best with your audience. Regularly reviewing your upsell performance will enable you to optimize your strategy continually.
Remember, the key is to focus on providing real value while making the upsell process as seamless and engaging as possible.
Frequently Asked Questions
What is the difference between an upsell and order bump?
An upsell is a secondary product, and it is offered after the primary product has already been purchased. An order bump is a secondary product, and it is offered to customers as they place their initial order.
How can I implement one-click upsells with Stripe?
To enable one-click upsells with Stripe, you can use third-party services like Cartfuel.io, DepositFix or other payment platform. These platforms integrate seamlessly with Stripe and allow you to create upsell sequences, making it easy to present additional offers to customers after their initial purchase.
Are there any costs associated with using third-party upsell tools?
Many third-party upsell tools offer free trials or basic versions at no cost, but they may have premium features that require a subscription or one-time payment. It's essential to review the pricing details of the tool you choose to understand any associated costs.